Lab 3: Batch Processing
Copyright Amazon.com, Inc. or its affiliates. All Rights Reserved. SPDX-License-Identifier: CC-BY-SA-4.0
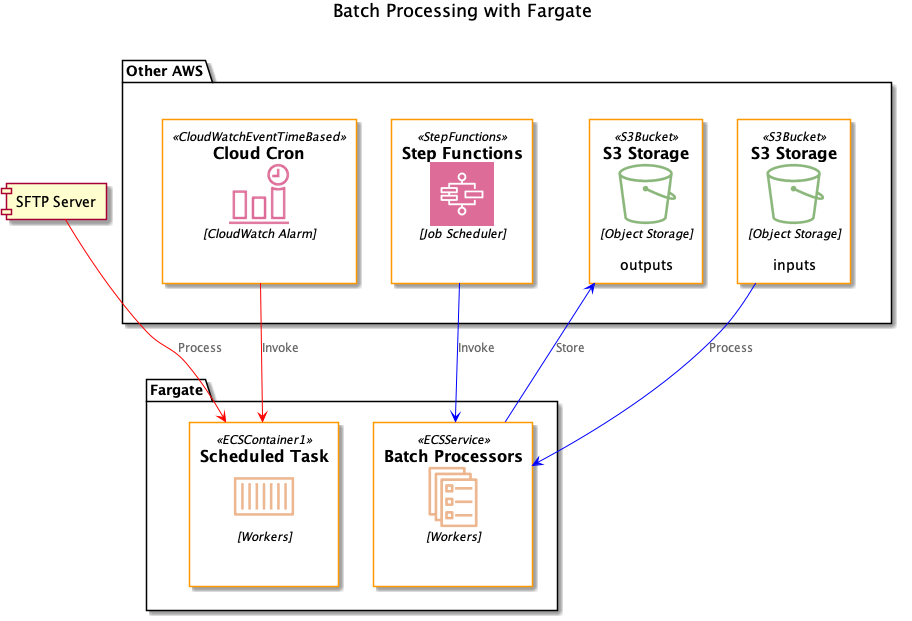
Now let’s look at two patterns for batch processing in Fargate, running scheduled tasks and integrating with a workflow system.
Scheduled batch processing
We often need to load data from an external site, and SFTP is still commonly used as a transfer mechanism. In this lab we’ll run a scheduled process to process files from an SFTP server.
Testing the SFTP connection
We created an SFTP server for you in Lab 1. You should see three outputs in the CDK from Lab 1; note these down for this lab.
fargate-workshop-dataeng.SFTPBucketName = <bucket>
fargate-workshop-dataeng.SFTPUserOut = sftpuser
To find the DNS address to use for the SFTP endpoint, go to the Transfer console and click on the VPC endpoint ID. Copy any of the IP addresses under the Subnets tab.
Go to the AWS Transfer for FTP console and upload your public key pair for the sftpuser account. Then back on the command line
sftp sftpuser@<server DNS>
Once connected, you should be able to go into the bucket directory and run commands.
> cd /<bucket>
> ls
Go ahead and upload a file into the SFTP site. We’ll process this file later in this lab.
Create a Git repository
Let’s create a Git repository. We’ll do this manually as setting up development tools is often done by hand.
Follow the guide to create a new repository in CodeCommit. Name it FargateSftpProcessor.
Follow the instructions on the console to clone your new repo into a local folder in Cloud9.
Check in source code
Go to your local copy of the FargateSftpProcessor repo:
cd ~/environment/FargateSftpProcessor
cp ~/environment/fargate-workshop/labs/batch-processing/sftp/* .
git add .
git commit -m "Initial commit"
git push
Store your SSH key as a secret
Follow the instructions to store a new secret in SecretsManager. Choose Other type of secret, and store the contents of ~/.ssh.id_rsa as a Plain text secret. Name the secret sftpkey. Accept all other default values.
Push image
On the CLI:
aws ssm get-parameter --name repo_uri_sftp
Note that value in the output, which is our ECR repository URI. Use this in the following commands:
cd ~/environment/FargateSftpProcessor
docker build -t <value>:latest .
$(aws ecr get-login --no-include-email)
docker push <value>:latest
Deploy the scheduled task
Deploy our task and scheduler using the CDK:
cd ~/environment/fargate-workshop/labs/fargate-workshop-cdk
cdk deploy fargate-workshop-dataeng-sfp
This will set up a CloudWatch event that kicks off the task every 5 minutes. You can verify this by looking at CloudWatch logs for the task.
The task right now is a stub that just prints out the name of any files in the SFTP site. As a challenge:
- Enhance the task to download files and store them in another S3 bucket. This will require not only changes to the Python code, but also changes to the permission policy for the task.
- Set up a CI/CD pipeline to deploy the task automatically. You can use the pipelines from Lab 3 as a template.
Integrating with workflow system
Let’s consider a case where you need to convert a batch of small XML files to JSON as part of a larger batch processing pipeline. While generally you can do this sort of operation using Spark or some other tool from the Hadoop ecosystem, a Spark job might be overkill if the number of XML files is small. Let’s look at how to tackle this operation using Fargate tasks orchestrated by a workflow system, AWS Step Functions.
Create a Git repository
Let’s create a Git repository. We’ll do this manually as setting up development tools is often done by hand.
Follow the guide to create a new repository in CodeCommit. Name it FargateBatchProcessor.
Follow the instructions on the console to clone your new repo into a local folder in Cloud9.
Check in source code
Go to your local copy of the FargateBatchProcessor repo:
cd ../FargateBatchProcessor
cp ../fargate-workshop/labs/batch-processing/sfn/* .
git add .
git commit -m "Initial commit"
git push
If you look at the code in app.py, you’ll see that this is a very simple task. It downloads one file from S3, converts it from XML to JSON, and then uploads the output to S3. You could do this sort of task equally well in Lambda, but do note that Fargate tasks have more storage available (10 GB for layer storage and 4 GB for volume storage) and don’t have any limitations on processing time.
Push image
On the CLI:
aws ssm get-parameter --name repo_uri_batch
Note that value in the output, which is our ECR repository URI. Use this in the following commands:
docker build -t <value>:latest .
$(aws ecr get-login --no-include-email)
docker push <value>:latest
Deploy the task
Deploy our batch processing task using the CDK:
cd ~/environment/fargate-workshop/labs/fargate-workshop-cdk
cdk deploy fargate-workshop-dataeng-batch
Invoke the task
Now we’re ready to invoke this task as part of a data pipeline. There are several workflow tools available to manage data pipelines, including Apache Airflow and Glue Workflows. But in this lab we’ll create a Step Function workflow. Step Functions are general purpose state machines and can coordinate any number of activities. Plus, Step Functions integrate natively with ECS.
Your task is to create a Step Function that will:
- Accept a list of XML files in S3 as input
- For each file, invoke our Fargate task to process it
Once you’ve created your Step Function, invoke it with a list of XML files and make sure you see a corresponding JSON file after the workflow completes.
A possible solution is available in ../fargate-workshop/labs/batch-processing/solutions/batch_sfn.json.
Here are some hints:
- You’ll need to provide some information like the Fargate cluster ID. In the provided solution, the fields you need to fill in are surrounded by brackets.
- The input to the Step Function should be a list of paths (without the bucket name) in the S3 bucket we created in the last step. The task already has the bucket name set as an environment variable. There are two example XML files in the
../fargate-workshop/labs/batch-processing/datadirectory, or you can try some XML files of your own. In either case you’ll need to upload these files to S3. - The role you use to run the Step Function must have permission to invoke your task.
Next steps
Although this was a simple example of batch processing, you can easily extend it to more realistic use cases. Your pipeline (Step Function) should have a step to gather the input file list, and then after the XML-to-JSON conversion is done, you can send those JSON files to another system for further processing.
Also, think about how you’d automate the creation of the Step Function using the CDK and CodePipeline, similar to some of our previous labs.